With Microsoft Forms you can create a form, such as a survey, invite others to respond to it using almost any web browser or mobile device, see real-time results as they're submitted, and export results to Excel for additional analysis or grading.
Access Microsoft Forms
You can access Microsoft Forms by following the steps:
- Sign into the https://my.nic.edu/ portal.
- Click Cardinal Mail.
- Click the 9 dots in the upper left-hand corner.
- Click Forms.
To access Microsoft Forms directly, go to: https://www.office.com/launch/forms and sign in with your NIC email address and password.
Create a Form or Survey
-
Select the drop down arrow next + New Quiz and select New Form.
-
Type a title for your form. You can also provide an optional description for it.
-
Select + Add new to add a question. You can choose to add Choice, Text, Rating, or Date questions. Select the drop-down list to see more question types, such as Ranking, Likert, File upload, Net Promoter Score, and Section.
Note: Changes are saved automatically.
Preview Your Form
-
Select Preview at the top of the design window to see how your form will look on a computer or mobile device.
-
Select Back to continue editing your form.
Share a Form
Choose who you want to respond to your form
Click Collect responses and choose from whom you want to collect responses.
-
Anyone can respond - Anyone inside or outside of your organization can submit responses to your form.
-
Only people in my organization can respond - Only people within your organization, signed in with a work or school account, can submit responses to your form.
-
Specific people in my organization can respond - Only people or groups in your organization that you specify can respond to your form.

Choose how you want to ask for responses

Select the Link button, and then click or tap Copy next to the text box that displays a web address. Copy and then paste this unique link wherever your intended audience can see and click it to access your form.

Select the QR code button, and then click or tap the Download button, which will download your QR code as a .png file. Insert the .png wherever your intended audience can scan it with a QR code scanner, such as a mobile device, to access your form.

Select the Email button. When your designated email application opens, add email addresses of the people for whom you intend the form. Microsoft Forms includes a brief note in the email body and a link to your form. You can customize the email message as you like.
Adjust Form Settings
With Microsoft Forms, you can create a form, such as a survey or poll. Use form settings to specify deadlines, identify form responders, display correct answers, and set other preferences for Microsoft Forms.
In Microsoft Forms, open the form for which you want to edit settings, select ... and click Settings.

Setting options for forms
In the Settings pane, you can select or clear options.

Who can fill out this form
-
Anyone can respond - Anyone inside or outside of your organization can submit responses to your form.
-
Only people in my organization can respond - Only people that belong to your organization will be able to respond to your form.
-
Record name - Keep track of people that have responded to your form.
-
One response per person - Limit form responses to only one per person. This will prevent individuals from filling out a form multiple times.
-
Specific people in my organization can respond - Only people or groups in your organization that you specify can respond to your form.
Notes:
-
Specific people in my organization can respond option applies to individuals and groups only within your organization. You can designate a total of up to 100 individual names or group names. Of the 100 limit, you can designate up to 20 groups (each group can contain up to 1,000 individuals). For example, you can collect responses from 80 individuals and 20 groups for a total of 100.
Options for responses
-
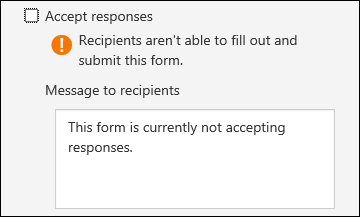
Accept responses - If this setting is unchecked, you turn off the ability to collect any additional form responses. You can also customize the default message that recipients see when trying to submit their response after you turn off this setting.
-
Start date and End date - You can specify an exact date and time when you want to start and stop collecting form responses. Click Start date, then click the date text box and select a date from the calendar control. Select a specific hour from the drop-down list of hour increments. Do the same for End date
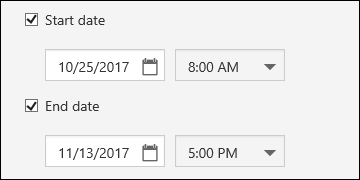
Note: You can’t select a date and time in the past.
-
Shuffle questions - When this is unchecked (default setting), questions are displayed to respondents in the same order you created them. When this option is checked, the order of questions displayed will be randomly shuffled. Each respondent sees the questions in a different sequence.
Note: If your form has multiple sections or pages, you will not be able to shuffle questions.
-
Show progress bar - Respondents will see a visual indicator of their progress while completing a form.
Note: The progress bar is only available on forms that contain multiple sections or pages.
-
Hide Submit another response - This will remove the Submit another response option if the form is set to Anyone can respond.
-
Customize thank you message - Display a thank you note upon completion of your form. Click in the text box to create a customized message.
Response receipts
-
Allow receipt of responses after submission - After completing the form, respondents will have the option to save or print a PDF of the form with their filled-in answers on the “Thank You” page. Note that selecting this setting still allows form respondents, internal to your organization, to ask for an email receipt of their form.
-
Get email notification of each response - Get notified by email each time a response is submitted.
View Results
After you create your form, adjust its settings, and share your form with others, it’s time to view the results. Open the form for which you want to review the results, and then select the Responses tab.

-
Select View results to see individual details for each responder, such as time it took to complete your form and the option(s) selected.
-
To easily view all of the response data for your form in an Excel workbook, select Open in Excel.
-
Select the More Details link to see the name of each responder and their answers for each question.
Style
To give your survey, or other type of form some visual customizations, Style your form by adding your own background image, or customize the background color.
-
Select Style to choose a color or background image.
Note: Depending on your form content, you may be presented with Style ideas, which include different image backgrounds from which you can choose.

If you don't want to use any of the style ideas, you can choose other colors and background images.
Can I get real-time updates in my Excel workbook?
Yes, you can get live updates about your forms without checking each one individually.
When you create a form in OneDrive, you can select Open in Excel to get an Excel workbook that has a live data connection to your form. It's automatically stored on OneDrive, and any updated data in your form will be visible in your workbook.
Additional Information
Microsoft Forms Basics
NIC IT Help Desk Knowledge Base – https://www.nic.edu/it