Box Sign is a set of electronic signature capabilities natively integrated into Box. It accelerates critical business processes by streamlining e-signature workflows in a secure and seamless way. Box Sign delivers the convenience and protection of electronic signatures to your entire organization.
Box Sign enables you to:
- Send documents to the people who need to sign them.
- Choose the order in which people need to sign.
- Add signature fields, date fields, text fields, and check boxes.
- Create optional templates with saved settings for quick and easy re-use.
- See the status of each signature request you've sent.
- Send automated and manual reminders to people who haven't yet signed.
- Generate reports summarizing your signature requests.
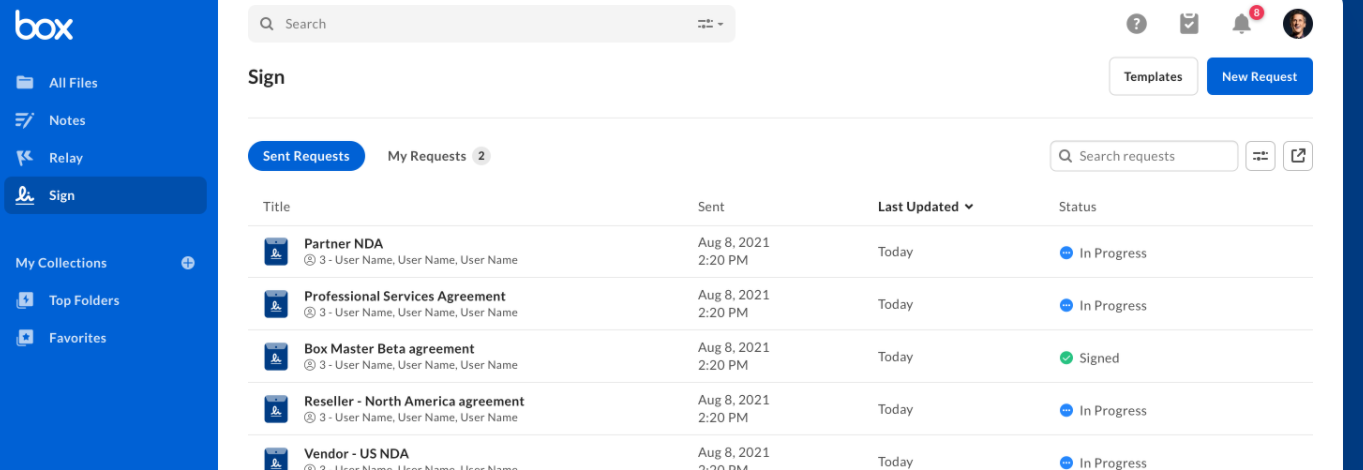
Sending a Document for Signature
Box Sign enables you to send documents to people for signatures. With Box Sign, you select who needs to sign, select the order in which people need to sign, and include additional fields such as date of signature, explanatory text, and check boxes.
To receive and sign documents, recipients do not need to have Box accounts — anyone with an email address can receive and sign the documents you send.
Sign into Box
- Go to the MyNIC Portal: https://my.nic.edu/
- Type Box in the search bar at the top of the screen and press Enter.
- Click Box.
Sending a Signature Request
You can access Box Sign through:
- The Sign icon in the left-hand side of your Box account window. The instructions in the following sections follow this route.
- Preview mode: open the document, then in the right-hand application bar click the Box Sign icon.
- All Files: hover on the document, then click the ellipsis button ("...") and select Sign.
Step 1: Uploading a document for signature
To upload a document for signature:
- In your Box All Files window, in the left sidebar click Sign. Box displays the Sign home page window.
- In the top-right corner, click New Request. Box displays the New Request window.
- Under Choose or Upload a Document, click the + button, and then select either Choose from Box or Upload File.
- Select a file.
- Now add and modify a recipient.
Steps 2 and 3: Adding and modifying a recipient
Define who will receive the request for signature. If you wish, also change the default location where the request is saved.

To select who needs to sign:
- Under Who needs to sign?, select who needs to sign:
- Only Me: You will be the only signer of the document. After you click Continue, Box displays the document for your signature.
- Me & Others: The document requires your signature, plus one or more other people. After you click Continue, Box displays a preview of the document, enabling you to select the signers, their roles, and other signing options.
- Only Others: The document requires one or more other people to sign, but your signature is not needed. After you click Continue, Box displays a preview of the document, enabling you to select the signers, their roles, and other signing options.
- In the top-right corner of the window, click Continue.
If you select Me & Others, or Only Others, Box enables you to add recipients. And after adding recipients, assign each recipient a role, and assign a specific sequence for signatures.
To select where to save the request:
- Under Where should the request be saved? select the location where you want to save the request in Box.
- Click Continue.
To add and modify a recipient:
- In the document preview window: on the right-hand side, under Recipients type a recipient's email address. As you add recipients, under Recipients Box displays the email addresses of those who will receive the document.
- Click a recipient's email address. On the right side, Box displays the Modify Recipient panel.
- Under Role assign a role to the recipient. Choose one of the following:
- Signer to require a signature from the recipient.
- Get a Copy to send the recipient a copy of the finalized request after everyone has signed.
- Approver to require approval of the request but not a signature.
- In-Person to require the recipient to sign on your device. This process does not include steps for recipient authentication, and the signing log indicates “not verified by Box Sign”. Immediately after document preparation is done, Box prompts in-person signers to sign, regardless of the selected signing sequence.
- Apply security. Optionally click any of the following:
- Require 2-Factor Authentication - NOT Recommended. This is not NIC's 2-Factor Authentication through Duo.
- Require password for a one-time password (OTP)
- In the top of the Modify Recipient panel, click the left arrow.
- To enforce a signing order, under Recipients, click the Specify Signing Order slider button.
- In the right-hand sidebar beside each recipient's email address, Box displays a number indicating the order in which the recipient receives the document for signature. To change this order, click the number and change it.
- Now prepare the signature request.
To remove a recipient:
- In the document preview window: on the right-hand side, click a recipient's email address. Box displays the Modify Recipient panel.
- Scroll down, and click Remove Recipient.
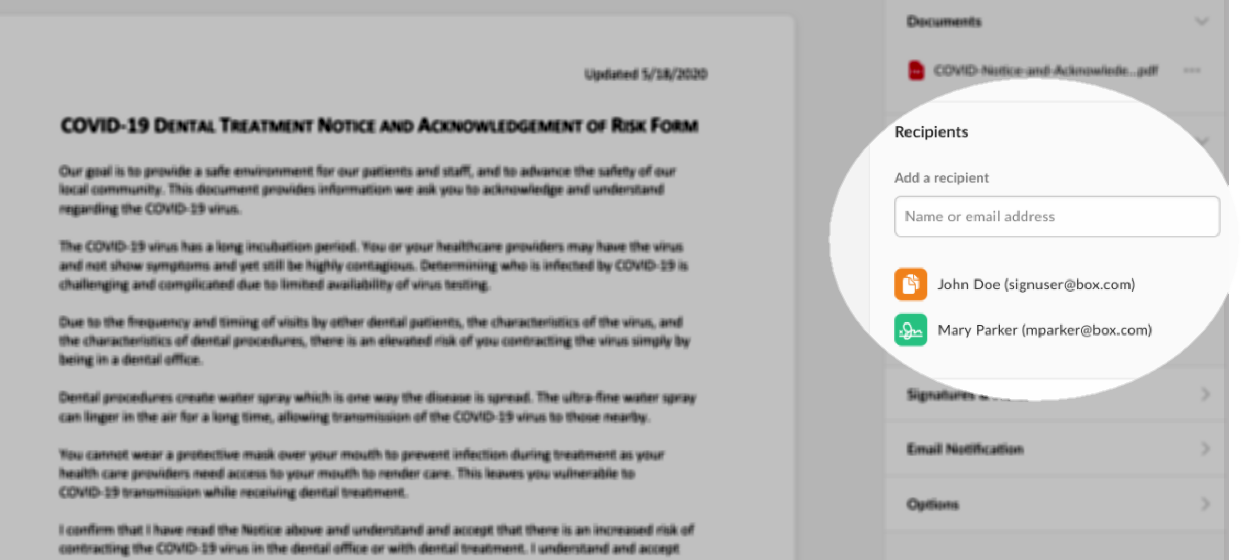
Step 4: Preparing the request
To prepare the signature request, you add signature fields, text fields, dates, and checkboxes to the request, as well as provide instructions and select to send automated reminders.
To add action fields to a request:
- On the right side, under Signatures & Fields, click a field you want to include in the signature request. You can include a field for any of the following:
- Signature
- Date Signed
- Text where the recipient can type information.
- Checkbox
- Hold down the mouse button and drag the field onto the document.
- Hover over the area where you want to add the field, and release the mouse button.
- Click the newly added field. Box displays a configuration window. Click the options you want to apply to the field.
- To define a date, checkbox, or text field as required, click the field then click Required Field. By default, Box defines signature fields as required.
- To set the current date into a date field, click the date field then click Advanced Options > Prefill Date.
- To make a text field span multiple lines, click the text field then click Advanced Options > Multiline.
- Adjust the position of the field by clicking in the middle of the field and dragging. Adjust the size of the field by clicking the bottom-right corner of the field and dragging.

To configure the email notification:
- On the right side, under Email Notifications:
- In Subject, type a description of the request.
- In Message, type instructions or other information for the recipient.
- To send automatic reminders, click Send automatic reminders then select the frequency with which Box will send reminders.
- Now set an optional expiration.
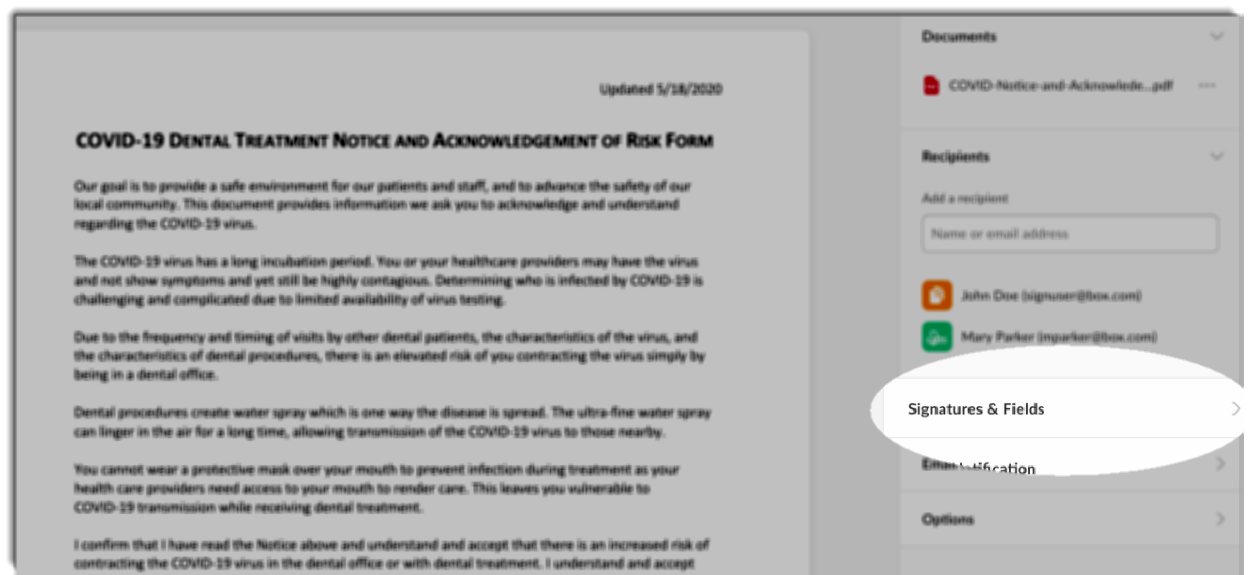
Step 5: Setting an expiration
When you prepare a request, you're also enabled to set an optional expiration for the request.
To set an expiration:
- In the right sidebar, click Options.
- Under Expire after, click the drop-down field and select a range of time.
- Now you're ready to send the request.
Step 6: Sending a request for signature
To send a request for signature:
- In the top-right corner of the document preview window, click Send Request.
Box immediately sends the document and signature request.
When someone signs a document you've sent, Box sends you an email.
Sending manual reminders
After you send a signature request, Box Sign also enables you to send manual reminders. When you send a manual email reminder, Box immediately again sends the original emailed signature request to all required signers who have not yet signed the document.
To send a manual reminder:
- In your Sign window, click the title of an unsigned document.
- Click the ellipsis button ("...").
- Click Send Reminder.
Additional Information
NIC IT Knowledge Base – www.nic.edu/it
For additional questions, please contact the IT Help Desk at (208) 769-3280 or helpdesk@nic.edu.